Mastering Azure Storage Accounts: A Step-by-Step Guide

I'm a senior engineer with a strong background in digital assurance and engineering services. I have extensive experience working with a variety of technologies, including VMWare, Windows, Linux, backup solutions, AWS, and Azure. I'm passionate about using my skills and knowledge to help businesses thrive in today's fast-paced, digital world. My expertise allows me to provide clients with reliable, secure, and efficient solutions that meet their unique needs. When I'm not working, you can find me exploring new hiking trails or trying out new recipes in the kitchen.
Azure Storage Accounts are a fundamental part of building scalable and secure cloud applications. In this blog post, we’ll cover everything you need to know about creating, securing, and managing Azure Storage Accounts. Whether you’re a beginner or an experienced cloud professional, this guide will help you get the most out of Azure Storage. Let’s get started! 💻
- Creating an Azure Storage Account 🛠️ :- Step 1: Navigate to Storage Accounts In the Azure Portal, search for Storage Accounts and click + Create.
Fill in the required details:
Storage Account Name: calabstorageXXXX (replace XXXX with random digits).
Region: Choose a region close to your users (e.g., South Central US).
Performance: Standard (general-purpose) or Premium (low-latency needs).
Redundancy: Choose Geo-redundant storage (GRS) for high availability.
Step 2: Configure Networking Set the Connectivity method to Public access from all networks (or restrict it to specific virtual networks for better security).
Step 3: Review and Create Click Review + Create, then Create to deploy your storage account. 🎉

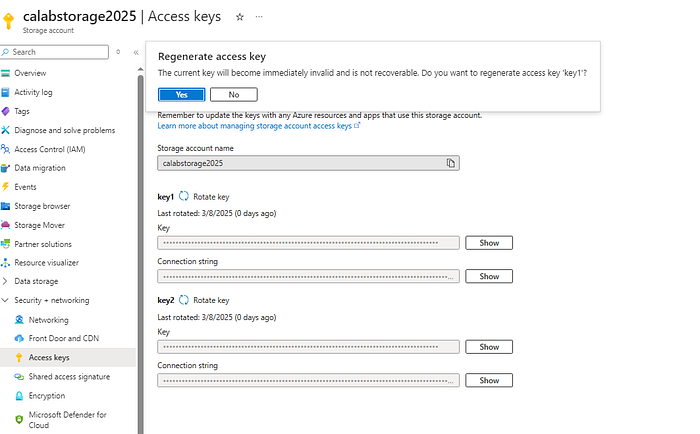
- Managing Access Keys for Secure Authentication 🔑 Step 1: Locate Access Keys In your storage account, click Access keys under the Security + networking section.
Click Show to reveal the keys and connection strings.
Step 2: Rotate Access Keys Regularly rotate your keys for enhanced security. 🔄
Click Rotate next to Key1 or Key2, then confirm the action.
Step 3: Use Connection Strings Use the Connection String to authenticate your applications. For example:
- Generating a Shared Access Signature (SAS) ⏳ Step 1: Navigate to Shared Access Signature In your storage account, click Shared access signature under the Security + networking section.
Step 2: Configure SAS Permissions Grant Read and List permissions for Blob services. 📂
Leave the Start and expiry time as default (8 hours).
Step 3: Generate SAS Token Click Generate SAS and connection string.
Use the SAS Token or Blob Service SAS URL for temporary access.p 3: Use Connection Strings
Copy the Connection String:
Use the Connection String provided for each key to authenticate your applications.
For example:
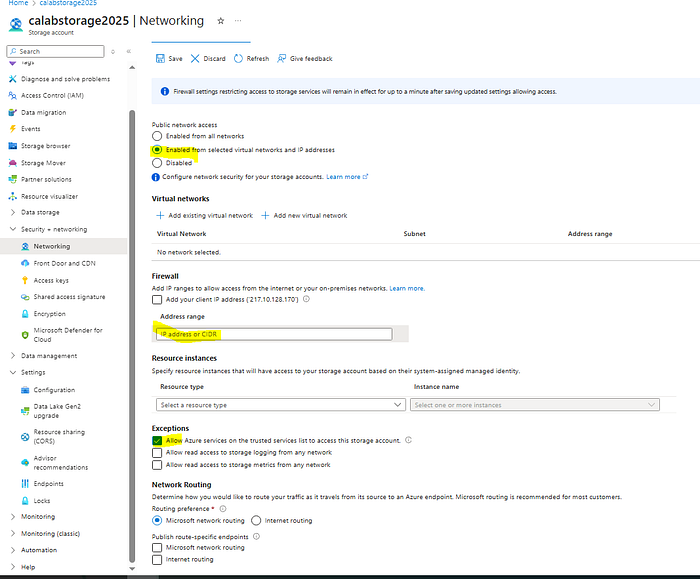
- Managing Network Access to Azure Storage Accounts 🌐 Step 1: Navigate to Networking In your storage account, click Networking under the Security + networking section.
Step 2: Restrict Access Change the Connectivity method to Selected virtual networks and IP addresses.
Add your public IP address to the Firewall section (e.g., 203.0.113.0/32).
Step 3: Configure Exceptions Allow trusted Microsoft services: Enable this to allow Azure services (e.g., Azure Backup) to access your storage account. ✅
Allow read access to logging and metrics: Enable this if you need to access logs from any network. 📊
Step 4: Save the Configuration Click Save to apply the changes. Now, only the specified IP address or virtual networks can access your storage account. 🔐
Why These Steps Matter 🛡️ Enhanced Security: Restricting access to specific IPs and rotating keys reduces the risk of unauthorized access. 🚨
Granular Control: SAS tokens allow you to grant temporary, limited access to resources. 🗝️
Compliance: These practices help meet security and compliance standards. 📜
Conclusion 🎉 By following these steps, you can create, secure, and manage Azure Storage Accounts like a pro! Whether you’re hosting a web application, storing critical data, or building a scalable cloud solution, these best practices will help you build a robust and secure Azure environment. 💪
Let me know if you have any questions or need further assistance! 😊


