Creating a Mac OS EC2 Instance in AWS Using Dedicated Hosts in Less Than 10 Minutes.

I'm a senior engineer with a strong background in digital assurance and engineering services. I have extensive experience working with a variety of technologies, including VMWare, Windows, Linux, backup solutions, AWS, and Azure. I'm passionate about using my skills and knowledge to help businesses thrive in today's fast-paced, digital world. My expertise allows me to provide clients with reliable, secure, and efficient solutions that meet their unique needs. When I'm not working, you can find me exploring new hiking trails or trying out new recipes in the kitchen.
Amazon Web Services (AWS) allows you to run macOS on EC2 instances using Dedicated Hosts. This is particularly useful for developers who need macOS environments for building, testing, and running macOS applications. In this guide, I’ll walk you through the step-by-step process of setting up a Mac OS EC2 instance using Dedicated Hosts in less than 10 minutes.
Why Use macOS on AWS?
Build and Test macOS Apps: Perfect for developers building macOS or iOS applications.
Scalability: Quickly spin up macOS instances as needed.
Cost-Effective: Pay only for what you use.
Prerequisites:-
Before you begin, ensure you have the following:
1.An AWS account with sufficient permissions to create EC2 instances and Dedicated Hosts.
2.Familiarity with the AWS Management Console.
3.(Optional) AWS CLI is installed and configured if you prefer command-line operations.
4.Inbound Rules Configuration.
5.Configure Apple Remote Desktop (ARD) settings.
Step 1: Allocate a Dedicated Host
A Dedicated Host is required to run macOS instances on AWS. Follow these steps to allocate one:
Log in to the AWS Management Console.
Navigate to the EC2 Dashboard.
In the left-hand menu, under Instances, select Dedicated Hosts.
Click on Allocate Dedicated Host.
Configure the Dedicated Host:
Instance Family: Select mac1.
Instance Type: Choose mac1.metal.
Availability Zone: Select the desired Availability Zone (e.g., us-east-1a).
Quantity: Set to 1.
Click Allocate.
Allocate Dedicated Host
Wait a few seconds for the Dedicated Host to be allocated. You’ll see it listed under Dedicated Hosts.
Step 2: Launch a macOS EC2 Instance
Now that you have a Dedicated Host, you can launch a macOS EC2 instance on it.
In the EC2 Dashboard, click on Instances in the left-hand menu.
Click Launch Instances.
Step 1: Choose an Amazon Machine Image (AMI):
Search for macOS in the AMI catalog.
Select the latest macOS AMI (e.g., macOS Monterey or macOS Ventura).
Step 2: Choose an Instance Type:
Select mac1.metal (the only instance type supported for macOS).
Step 3: Configure Instance Details:
Under Tenancy, select Dedicated Host.
In the Host field, select the Dedicated Host you allocated earlier.
Configure other settings (e.g., VPC, subnet, IAM role) as needed.
Step 4: Add Storage:
The default storage is usually sufficient (at least 60 GB is recommended for macOS).
Step 5: Configure Security Group:
Assign a security group that allows SSH (port 22) and any other necessary ports (e.g., RDP for remote desktop access).
Step 6: Review and Launch:
Review your settings and click Launch.
Select an existing key pair or create a new one for SSH access.
Step 3: Connect to Your macOS Instance
Once the instance is running, you can connect to it using SSH.
In the EC2 Dashboard, select your instance and note its Public IP or Public DNS.

Use SSH to connect to your instance:
ssh -i /path/to/your-key.pem ec2-user@<public-ip>
The default username for macOS instances is ec2-user.
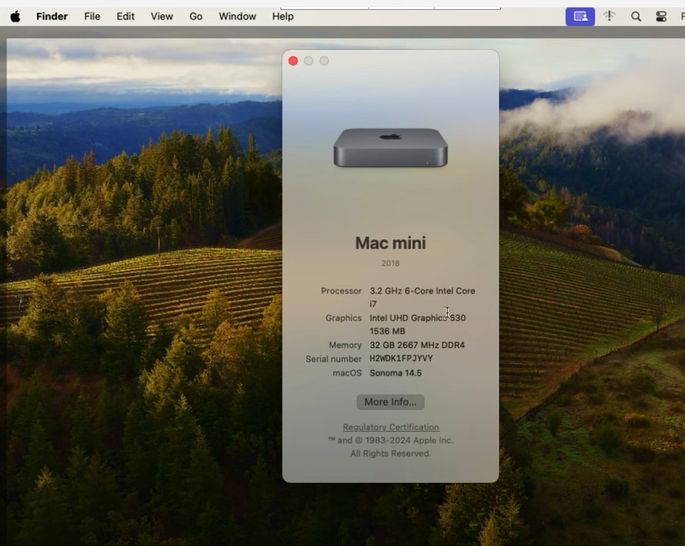
Step 4: Verify the macOS Environment
After connecting to your instance, verify that the macOS environment is set up correctly.
Check the macOS version:

sw_vers
You should see output similar to:

(Optional) Install additional tools or dependencies as needed.
Inbound Rules Configuration:
This section appears to be a table or list of inbound rules for a security group, possibly in a cloud environment like AWS.
The rules include:
SSH on TCP port 22, with a custom source.
Custom TCP on port 5900, which is commonly used for VNC.
Custom TCP on port 3389, which is commonly used for RDP (Remote Desktop Protocol).
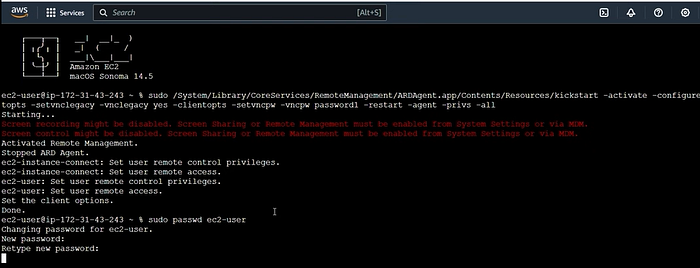
1. Configure Apple Remote Desktop (ARD) settings:

sudo /System/Library/CoreServices/RemoteManagement/ARDAgent.app/Contents/Resources/kickstart -activate -configure -access -on -clientopts -setvnclegacy -vnclegacy yes -clientopts -setvncpw -vncpw password1 -restart -agent -privs -all
Change the password for the user ec2-user:

sudo passwd ec2-user
Make sure to replace password1 with the actual password you want to set for the VNC connection. When you run the sudo passwd ec2-user command, you will be prompted to enter a new password for the ec2-user account.
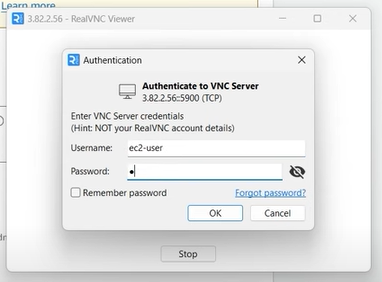
Reference screenshot
Windows vnc download URL https://www.realvnc.com/en/connect/download/viewer/windows/
“Image credits: iExplorer”
Step 5: Clean Up (Optional)
To avoid unnecessary charges, release the Dedicated Host and terminate the instance when you’re done.
Terminate the Instance:
In the EC2 Dashboard, select your instance and click Instance State > Terminate Instance.
Release the Dedicated Host:
Navigate to Dedicated Hosts, select the host, and click Actions > Release Host.
Final Thoughts
Setting up a macOS EC2 instance on AWS using Dedicated Hosts is quick and straightforward. With this guide, you can get started in less than 10 minutes. Remember to clean up your resources to avoid unnecessary charges.
If you found this guide helpful, feel free to share it with others. Happy coding! 🚀
Image credits: itExplorer


